In this post series we’re going to configure vSphere Replication, Site Recovery Manager and then finally VMware NSX. The purpose of this series will be to:
Guides:
- Deploy vSphere Replication
- Deploy VMware Site Recovery Manager
- Deploy NSX Enterprise
Objectives:
- Prepare non-array based replication
- Replicate workloads and test fail-over plans
- IP Customizations
- NSX – Extent Layer 2 beyond 1 site/datacenter using VXLAN & NAT
- Instantaneous and automated fail-over leveraging VMware products
First Steps (These are a MUST):
Prerequisites before we start:
Note – The names in this lab are my home lab and the names will reference the screenshots to help follow along.
Site 1: (Bora Bora) – Network 10.1.1.0/24
Must have the following before we begin in each site.
- Domain Controller(s)
- vCenter Server (Use the VCSA appliance). I’m using the vCenter 6.7
Site 2: (Moorea) – Network 10.1.2.0/24
- Domain Controller
- vCenter Server (Use the VCSA appliance). I’m using the vCenter 6.7
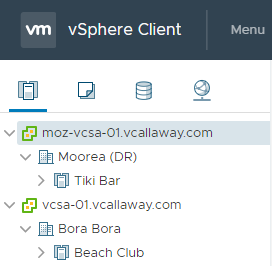
These are apart of the same SSO domain thus will be in linked mode. As shown below:
Note – The Bora Bora site will be our PRIMARY site, and Moorea will be our DR site.
ProTip –
- Make sure that Active Directory Sites and Services know about each other!
- Create 2 sites in ADSS one for site one (which will be called “Default-First-Site-Name”), if you don’t change it. Once done, then create a new for the second site and name it appropriately.
- Once complete then create and assign each subnet to their respective sites.
- IMPORTANT: Make sure that there are reverse lookup zones in DNS, this is required before the VCSA’s can be deployed.
- MORE IMPORTANT: Make sure that any appliances that are deployed have forward and reverse DNS entries. This will save you tons of headaches going forward.
Side note: 10.1.1.0 and 10.1.2.0 are on the same LAN but will simulate geographically separated sites in this tutorial. The public IP addresses towards the last part of this series will be handled by the same firewall but with different public static IP’s to demonstrate fail-over and access from an external resource (essentially 2 separate Datacenters for fail-over).
Once this is done, we’re ready to move on to Part 2.


