Objective 8.2 Topics:
- Configure and Manage VMware Certificate Authority
- Configure and Manage VMware Endpoint Certificate Store
- Enable/Disable Certificate Checking
- Replace Default Certificate with a CA-Signed Certificate
- Configure SSL Timeouts According to a Deployment Plan
Configure and Manage VMware Certificate Authority
Learning Points:
- In vSphere 6, the VMware Certificate Authority (VMCA) provisions each new ESXi host with a signed certificate that has the VMCA as the root, by default.
- Provisioning happens when the ESXi host is added to vCenter inventory as a part of an installation or upgrade to ESXi 6.0
- Managing of these certificates can be done via the Web Client or the vim.CertificateManager API. CLI’s are not supported.
- Communications between ESXi and vCenter use SSL for most all management traffic.
vSphere 6.0 Supported Certificate Modes:
VMware Certificate Authority – The default mode. Use this mode if VMCA provisions all ESXi hosts, either as top-level CA or as an intermediate CA.
Custom Certificate Authority – Use this mode if the certificates we’re using are signed from a third-party. Such as, GoDaddy, Digicert etc…
Thumbprint Mode – vSphere 5.5 used thumbprint mode. In vSphere 6.0 thumbprint mode is still an option, such as fallback. This mode checks that the certificate is formatted correctly but does not check the validity of the certificate. It is recommended to not use this mode unless we can’t resolve an issue with the other 2 modes previously listed.
In vSphere 6.0 we can vuew the certificate expiration for the first 2 modes in the Web Client. We can view the host certificates directly from the hosts themselves.
Expiration Alarms:
A yellow alarm is raised if the certificate is in the Expiring Shortly state which is less than 8 months.
A red alarm is raised if the certificate is in the Expiration Imminent state which is less than 2 months.
Host Name and IP Address Changes:
In vSphere 6.0, if a host name or IP address change takes place, vCenter might consider a host’s certificate invalid. Depending how the host was added to vCenter determines if manual intervention is required. Manual intervention includes reconnecting the host and/or removing the host from vCenter and adding it back.
Change the Certificate Mode
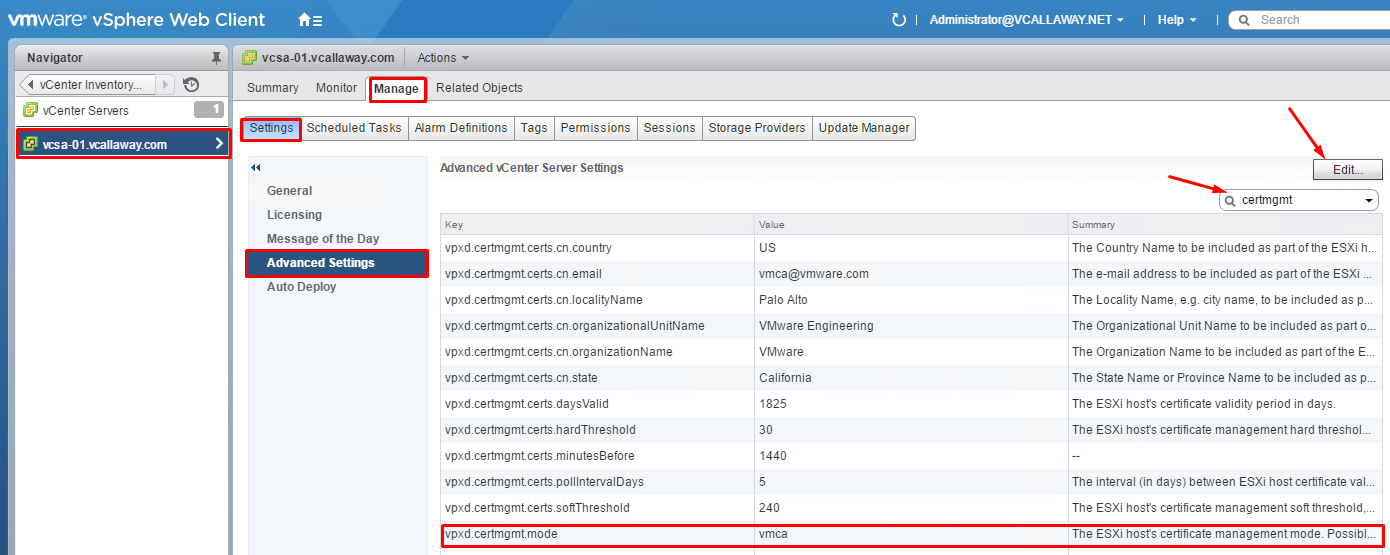
We can use the vCenter Server’s advanced options to change the certificate mode.
Navigate to the vCenter Server’s advanced settings and search for the certificate management by typing: certmgmt. Here we can view the current setting.
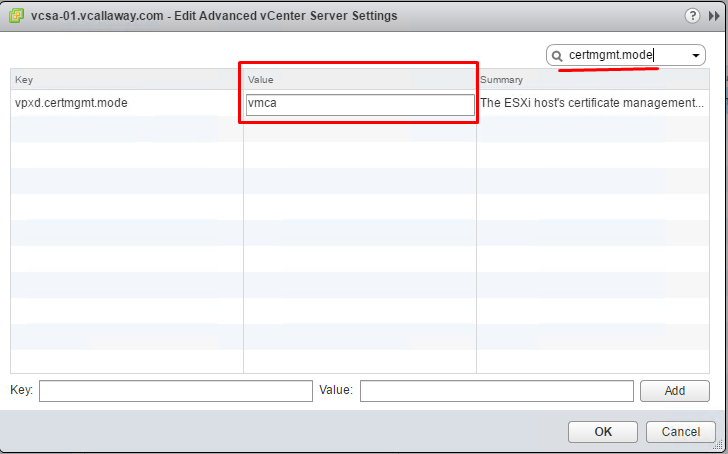
To change the setting, click Edit and type: certmgmt.mode in the search box
Here we can change the mode. Our 2 options are custom or thumbprint. After the change the vCenter Server service must be restarted.
Managing Certificates with the Platform Services Controllers (PSC) Web Interface
- What can we do in the PSC Web Interface?
- View current certificate stores and add/remove certificates.
- View the VMCA instance associated with the PSC.
- View certificates generated by the VMCA
- Renew existing certificates or replace certificates.
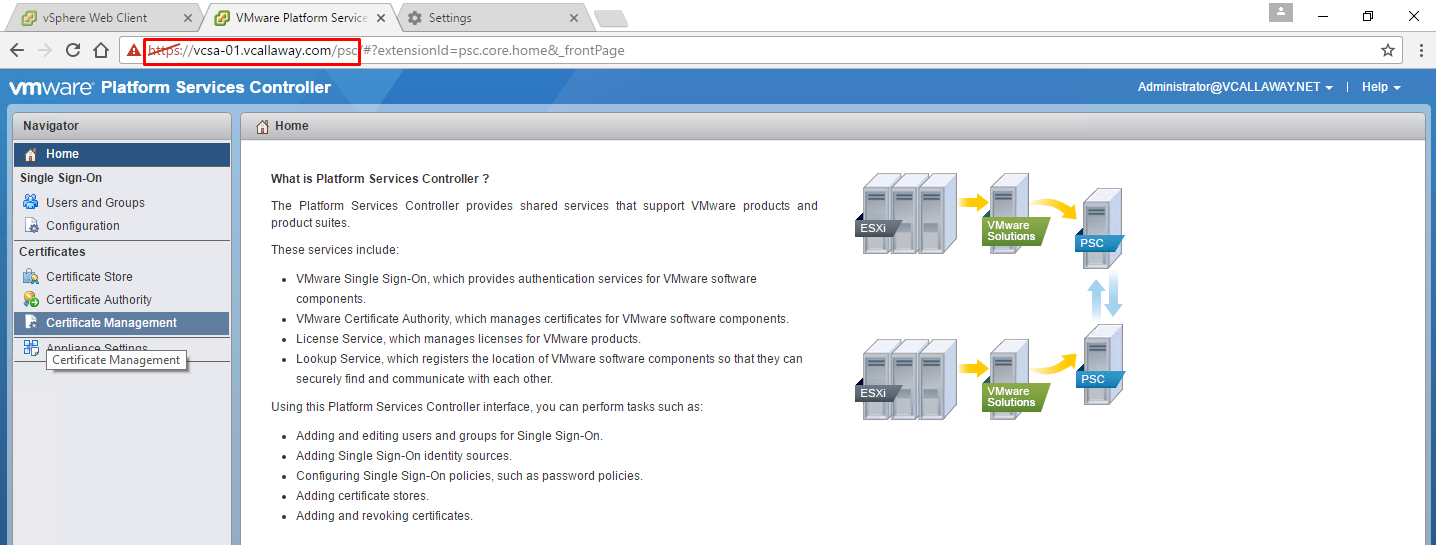
Log into the PSC Web Interface by typing: https://psc_hostname_or_IP/psc
If embedded PSC, the hostname/IP is the same as vCenter Server.
Be sure to login with an administrator user in the SSO domain.
Managing Certificates with the vSphere Certificate Manager Utility
The vSphere Certificate Manager utility allows you to perform most certificate management tasks interactively from the command line.
The tool can be ran from the following locations depending on the operating system runs vCenter
Windows: C:\Program Files\VMware\vCenter Server\vmcad\certificate-manager.bat
Linux/Appliance: /usr/lib/vmware-vmca/bin/certificate-manager
Configure and Manage VMware EndPoint Certificate Store
VMware Endpoint Certificate Store (VECS) serves as a local (client-side) repository for certificates, private keys, and other certificate information that can be stored in a keystore.
VECS runs as part of the VMware Authentication Framework Daemon (VMAFD). VECS runs on every embedded deployment, Platform Services Controller node, and management node and holds the keystores that contain the certificates and keys. VECS polls VMware Directory Service (vmdir) periodically for updates to the TRUSTED_ROOTS store. You can also explicitly manage certificates and keys in VECS using vecs-cli commands.
Since the stores have a lot of information, refer to the vSphere 6 Documentation. Store’s Link
Enable/Disable Certificate Checking
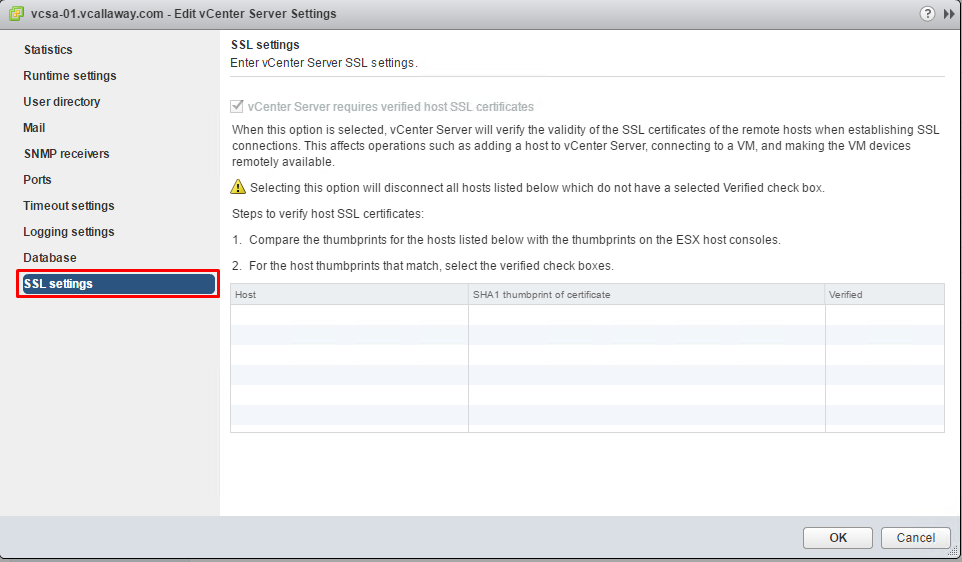
To prevent man-in-the-middle attacks and to fully use the security that certificates provide, certificate checking is enabled by default. You can verify that certificate checking is enabled in the vSphere Web Client.
Generate ESXi Host Certificates
You typically generate new certificates only if you change the host name or accidentally delete the certificate. Under certain circumstances, you must force the host to generate new certificates.
We can do this by the following:
- Logging in to the ESXi shell as a user with admin privileges.
- Backup existing certificates in the /etc/vmware/ssl directory.
- Run the command: /sbin/generate-certificates
- Restart the host.
Alternatively to restarting the host, we can put the host in maintenance mode, install the new certificate and then use the DCUI to restart the management agents.
To confirm the host generated new certificates we can run the command (ls -la) and compare the time stamps with the original certificates we backed up previously.
Replace Default Certificate with a CA-Signed Certificate
This topic is very indepth and requires some knowledge outside the scope of VMware. I’ll list the link to the documentation.
Configure SSL Timeouts According to a Deployment Plan
We can configure SSL timeouts for ESXi by editing a configuration file on the ESXi host.
Timeout periods can be set for 2 types of idle connections:
- The Read Timeout setting applies to connections that have completed the SSL handshake process with port 443 of ESXi.
- The Handshake Timeout setting applies to connections that have not completed the SSL handshake process on port 443 of ESXi.
Idle connections are disconnected after the timeout period. By default, fully established SSL connections have a timeout of infinity
Log into the ESXi Shell and navigate to:
Next, we’ll need to edit the configuration file. The file we need to edit is called config.xml. Let’s open that file with the command vi config.xml
We’ll need to add the lines with their values:
<readTimeoutMs>30000</readTimeoutMs>
<handshakeTimeoutMs>3000</handshakeTimeoutMs>
These values will be represented in milliseconds. So if we wanted to set the timeout values to 30 seconds, our value would be 30000.
After we’ve made our changes, we need to save the file and close it. Restart the rhttpproxy process: /etc/init.d/rhttpproxy restart


Let’s open that file with the command vi config.xml
We’ll need to add the lines with their values:
30000
3000
1. where the exact location inside that xml file we need to add the line?
Regards
Saneesh k